How to Make a Homemade/DIY Telescoping Pole From EMT (Electrical) Conduit
- EST - Austin
- Aug 29, 2021
- 3 min read
Updated: Jan 24, 2022
Making your own telescoping pole out of electrical metallic tubing (EMT) conduit is easy using Cinch: The Telescoping Coupling for EMT Conduit! EMT conduit, a low-cost and readily available steel tubing, is ideal for all sorts of DIY projects, and is ready for pickup at your local hardware store!
Telescoping poles are useful for all kinds of projects:
Outdoor lighting
Indoor lighting
Home maintenance
Outdoor sports
Decorations
Crafts
Photo, video, and sound equipment
Banners and signs
Curtains
Entry/exit barriers
Security system mounts
Tents and outdoor shelters
Stage props
Bird, bat, and other wildlife house mounting poles
Flagpoles
Boating push poles
Hunting target stands
Screens for display, or for privacy
And more!
Our EMT conduit telescoping couplings are:
UV-resistant
Durable
Affordable
Ideal for your next project!

To make your own telescoping pole:
Prepare EMT Conduit
Assemble Pole with Telescoping Couplings
Add Extra Attachments
And that's it!
Supplies
Disclosure: Some of the links below are affiliate links. This means that, at zero cost to you, I will earn an affiliate commission if you click through the link and finalize a purchase.
1/2" EMT conduit
3/4" EMT conduit
1" EMT conduit
Tape measure
Marker
Optional: 3D-printable adapters/fittings
Step 1: Prepare EMT Conduit
Collect the pieces of EMT conduit that you want to make into a telescoping pole. EMT conduit is made of galvanized steel and comes in standard sizes. For this blog post, we used three pieces of 1/2", 3/4", and 1" conduit. A 5-foot length of 1/2" EMT conduit can be purchased from your local hardware store for about $2.50, and a 10-foot length costs about $3.50, with zero shipping cost if you pick it up yourself!
EMT conduit standard sizes have the following diameters. The Cinch telescoping coupling system is specifically designed to work with these sizes:
1/2" EMT conduit: 0.706" outside diameter, 0.622" inside diameter
3/4" EMT conduit: 0.922" outside diameter, 0.824" inside diameter
1" EMT conduit: 1.163" outside diameter, 1.049" inside diameter
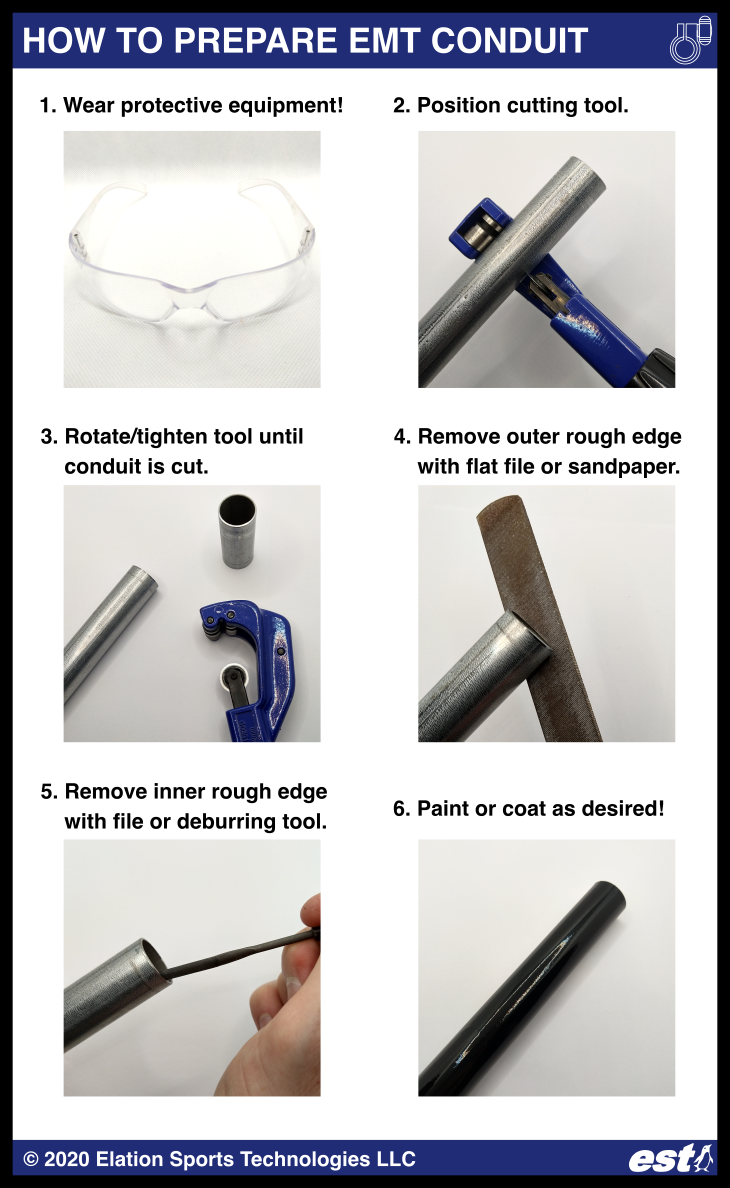
To prepare the EMT conduit:
Use a tape measure and a marker to mark the length of each piece of EMT conduit. Wear protective equipment (including safety goggles) before cutting the conduit!
Use a rotary tube cutting tool to cut each piece of conduit by tightening the tool on the conduit, rotating the tool, and continuing to tighten and then rotate the tool, until the conduit is cut.
Remove all sharp edges using any one of the following tools:
If desired, paint or coat the cut pieces of conduit. Now we are ready to assemble the telescoping pole!
Step 2: Assemble Telescoping Pole
To assemble the telescoping pole from the Cinch telescoping EMT conduit system:
Install outer coupling onto the smaller (inner) conduit.
Install inner sleeve onto the end of the smaller (inner) conduit.
Insert the smaller (inner) conduit inside the larger (outer) conduit.
If the fit is tight, gently tap the sleeve into position using a hammer with a wooden block on top to prevent damage to the sleeve.
If the fit is loose, wrap the tip of the EMT conduit using one or more layers of cellophane tape.
Tighten the screw to attach the coupling to the larger (outer) conduit using a Phillips head screwdriver.
Tighten the hand knob to lock the position of the smaller (inner) conduit.
Done! Whenever you want to adjust the pole, simply loosen the hand knob to set the telescoping pole to a new position:
Step 3: Add Extra Attachments
To make your telescoping pole usable for your specific project, you may need to add other attachments to your pole. These can include:
Clips and caps
String/twine
Wires, LEDs and other electrical components
Custom wooden, metal, and plastic pieces
A base or stand
Camera mount
To attach any of these items to the pole, in a pinch, you can use:
Tape
Glue
Epoxy
Rubber bands
String
If you have access to a 3D printer, you can also consider using the following file kits. These kits require 10-32 x 1/2" screws and nuts when needed:
Extra attachments can also be added to your telescoping pole by hand-drilling a hole in the pole and using machine screws and nuts. Remember to remove the rough edges from any holes you drill in EMT conduit, and wear protective equipment (safety glasses at a minimum) while doing so! Handle the telescoping pole you've made with care to minimize the chance of injuring yourself or others, and be responsible!
Check out some of our other blog posts!
Thanks for reading! Come and check out our available products now at www.elationsportstechnologies.com/shop!
Austin Allen
Founder and Owner
Elation Sports Technologies LLC


Comments